 USERGUIDE
FOR “conVOT”(version 0.9)
USERGUIDE
FOR “conVOT”(version 0.9) 
Assumptions for ASCII Table files
conVOT is a tool for converting ASCII or FITS tables to VOTable
format. For ASCII files, it supports both ASCII files with column delimiters
and ASCII files with fixed width columns. For FITS files, it supports FITS
ASCII and Binary tables.
Click here for the Release Notes and disclaimer
information.
conVOT has been developed as a part
of the Virtual
Observatory - India initiative by the
Inter-University Centre for Astronomy and Astrophysics (IUCAA) and Persistent Systems . The VO-I project is supported by the Ministry of
Information and Communication Technology of the Government of India.
conVOT
uses nom.tam.fits library for reading
FITS tables. nom.tam.fits is developed at Heasarc.
conVOT
uses VOTable
JAVA Streaming Writer for writing the data in VOTable format. The VOTable
JAVA Streaming Writer is developed as part of Virtual Observatory
B. Assumptions for ASCII Table files
1. The ASCII file must be in a tabular format. The file
should have some delimiter between its columns or the columns must be of fixed
width.
2. All comment lines should precede with ‘#’ (hash)
character.
3. Comment lines always appear in the beginning of the
ASCII Table file and not elsewhere.
4. The first non-blank line immediately following the
comment lines is treated as heading line & the non-blank line following the
heading line is treated as unit line. But, this can be changed by the user.
1. System Requirements
conVOT requires Java Runtime
Environment (1.3 or above).
2. Starting Instructions
To use the standalone version of conVOT, you will need to
download the executable jar file named conVOT.jar. The file can be executed by
typing the following command at the command prompt: java -jar conVOT.jar. This will launch first screen of the application.
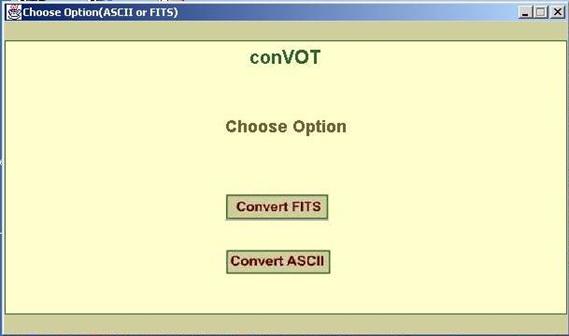
1. As shown in figure0, the tool allows you to choose between
ASCII table file and FITS table file.
Note: For all the figures below:
1. The text area and
table displays only first rows in the table.
2.
You can load the first screen by choosing ‘Main Menu’ option.
3.
You can find information about the screen by choosing ‘About this Screen’ menu
option.
4.
You can exit the tool by clicking on ‘Exit’ menu option.
5.
You can go back to the previous screen by clicking on ‘Back’ button.
2. Refer to following steps for conversion
of ASCII files:
a. The screen in figure1 allows you to choose the ASCII
table file. First, click on the “browse” button. A file chooser dialogue box
will appear which will allow you to choose the ASCII file. You can directly
enter the full path of ASCII table file or it’s URL in the text box.

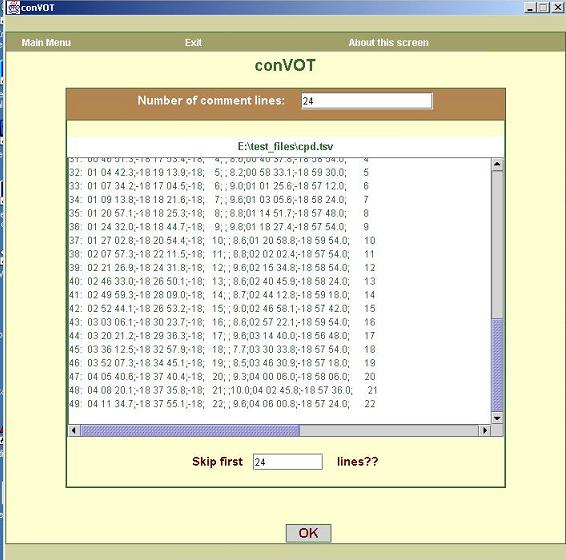
b. Once the ASCII table file is loaded, the tool tries to find
out if some comment lines (lines beginning with #) precede the actual data.
As shown in figure2, the tool finds
out the number of lines beginning with ‘#’ and puts that number in the text
field titled “Number of Comment lines”. If you want to skip few lines in the
beginning in addition to comment lines, you have to enter the value in
‘skip first xx lines’ text field.
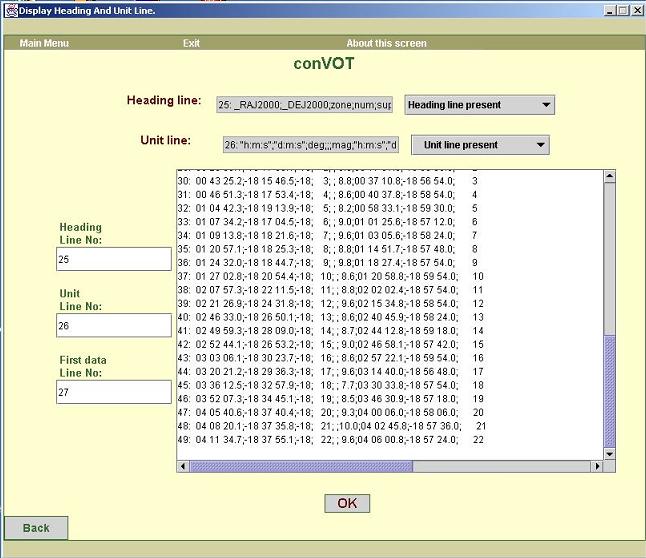
c. The screen shown in figure3 helps you to choose heading
line, unit line and first data line.
By
default, the first non-blank line following the comment lines (and any extra
lines) is treated as heading line. The line together with its line
number is
displayed in the text field titled ‘Heading line’.
If you want
to change the heading line number, look at the text area at the bottom which
displays first few non-comment lines along with their line numbers. Enter the
proper number in the text field titled ‘Heading Line No’ at the bottom left
corner.
Use same
procedure for choosing unit line and first data line. By default the first
non-blank line following the heading line is treated as unit
line and
first non-blank line following unit line is treated as first data line.
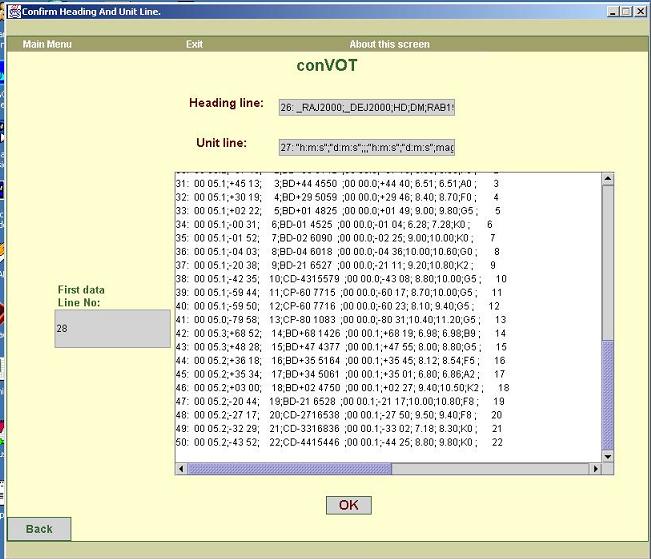
d. The screen shown in figure4 confirms the information
entered on the previous screen i.e. heading line, unit line and first data
line.
e. The tool now determines the type of ASCII table file.
There are two possibilities:
i. The ASCII
table file is a file where columns are separated by delimiters.
The screen
in figure5 is displayed for such a file.
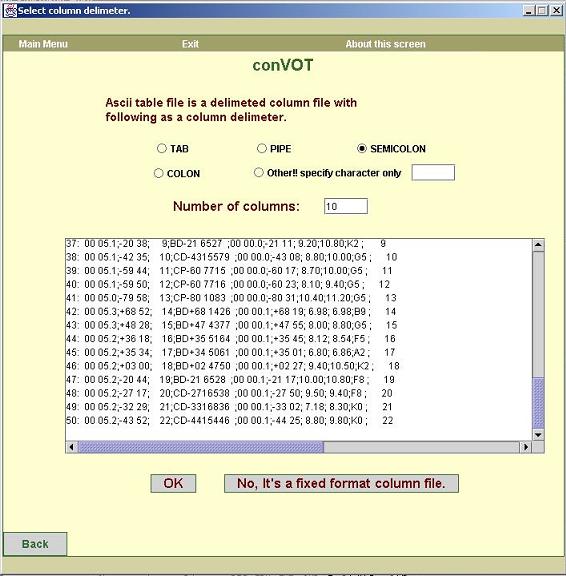
There are four possible delimiters that the
tool can detect.
1. tab
2. pipe
3. semicolon
4. colon
If some character other than these four is the
possible delimiter, you can enter it in the
text box titled “Other!!! Specify character
only”.
The tool
also displays the guess value for “number of columns” which can be
changed.
ii. The
ASCII table file is a file with fixed width columns.
Screen
shown in figure6 is displayed for such a file.
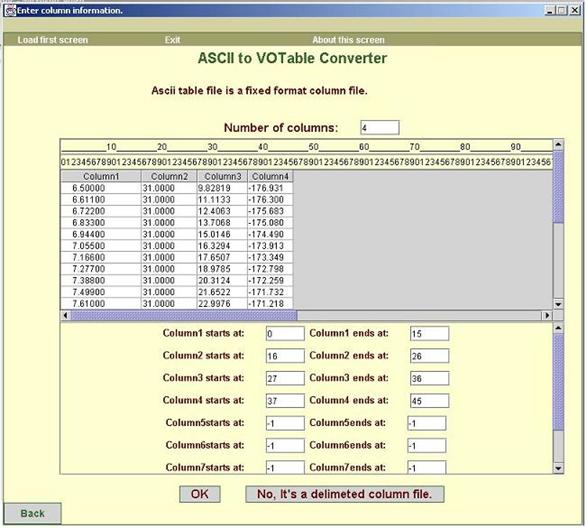
For fixed
width files, the tool first displays the guess value for number of columns. It
also displays information about start and end
position of each column in the text boxes in
the bottom portion of the screen.
You can
confirm these positions by looking at the table & the ruler in the upper
portion of screen. The table shows ASCII table file
split into
columns.
The screen
also displays 5 extra columns at the bottom in case the file contains more
columns than what the tool has found. In case the file contains less columns,
just set the start & end positions of last column(s) to -1.
f. As shown in figure7, the next screen displays metadata
information about the ASCII table file.
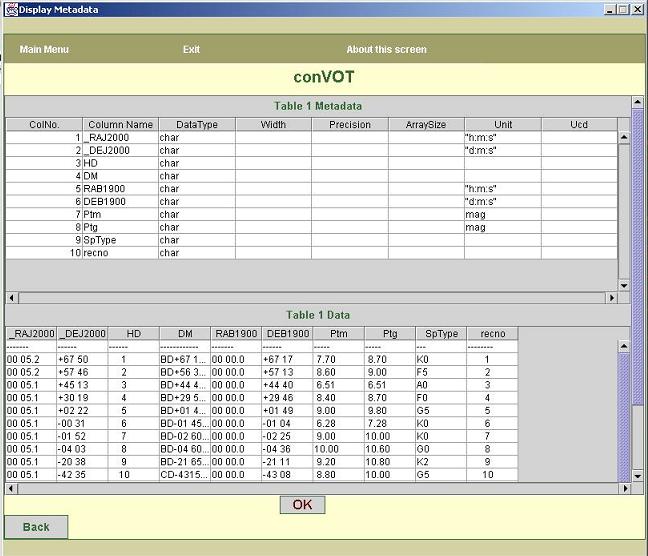
The screen
displays two tables in the scroll pane. First table is an editable table which
displays metadata information about all
columns in
the table. Second table is a Data table which shows first few rows in the table
split into columns.
The
metadata table contains following metadata:
1. Column Name: If the
heading line was entered on one of the previous screens, that line is parsed
and corresponding column names
are put by
default. Otherwise, the tool puts column names as column1, column2, etc.
2. Data Type: The tool does
the parsing of first few rows in the ASCII table and finds out the guess value
for column data types
3. Width: The user can enter the information about width of the
numeric field here. This metadata information is required only for numeric
columns.
4. Precision: For fractional data, user can enter the
information about precision of the data here.
5. ArraySize: The user can enter information about size of character
array here (width of the char field). The tool does not put any default value here. This metadata information is
required only for character data.
6. Unit: If the unit line
was entered on one of the previous screens, that line is parsed and corresponding
units are put by default.
7. Ucd: Ucd of the column
can be entered here.
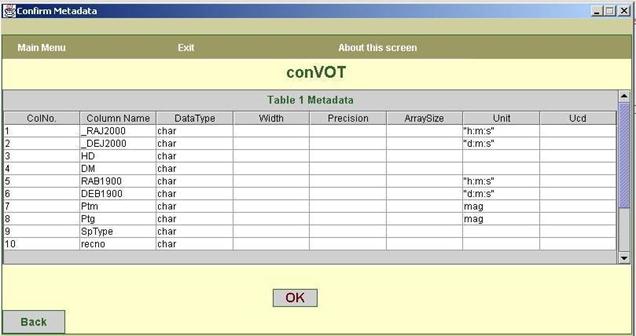
g. The next screen, shown in figure8, confirms the metadata
displayed on the previous screen. This screen has only one table, which is a
non-editable metadata table. If you want to change the metadata information,
you have to go to the previous screen by clicking on the back button.
This
screen does not display data table.
h. The last screen, as shown in figure9 displays the generated
VOTable. The text area displays only first 20 rows of the generated VOTable.
But, when
you click on save button at the bottom, the entire VOTable gets saved.

3. Refer to following steps for conversion
of FITS files:
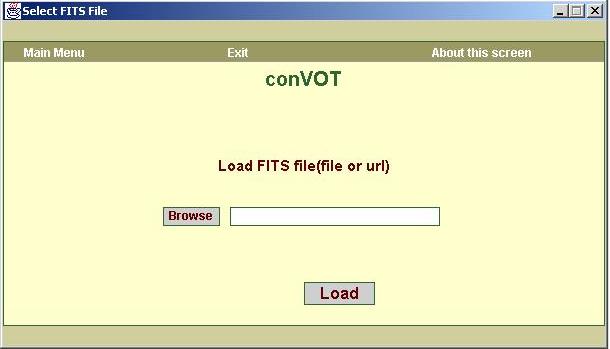
a. The screen, shown in figure10, allows you to choose FITS file. First, click
on the “browse” button. A file chooser dialogue box will appear which will
allow you to choose the FITS file. Or you can directly enter the full path of
FITS file or it’s URL in the text box.
b. As shown in figure11, the next screen displays metadata
information about the FITS file.
The screen
displays two tables for every table HDU in the FITS file. First table is an editable
table which displays metadata
information about all columns in the table. Second table is a Data table
which shows first few rows in the table split into columns. The user can
confirm the default metadata or enter the new metadata by looking at this data
table.
The
metadata table contains following metadata:
1. Column Name: The
tool finds this information from TTYPE keyword in the header.
2. Data Type: The tool
finds this information from TFORM keyword in the header.
3. Width: The tool
finds this information from TFORM keyword in the header.
4. Precision: The tool finds
this information from TFORM keyword in the header.
5. ArraySize: The tool
finds this information from TFORM keyword in the header.
6. Unit: The tool finds this information from TUNIT keyword in the
header. If the TUNIT keyword is missing, this field is
left
blank.
7 Ucd: The tool finds this information from UCD keyword in the
header. If the UCD keyword is missing, this field is left blank.
g. The next screen, shown in figure12, confirms the
metadata displayed on the previous screen. This screen has only one table,
which is a non-editable metadata table. If you want to change the metadata
information, you have to go to the previous screen by clicking on the back
button.
This
screen does not display data table.
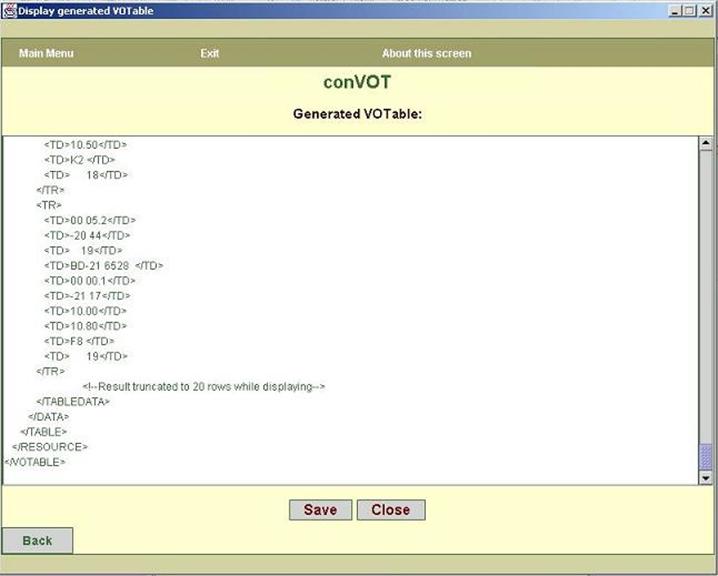
h. The last screen, as shown in figure13, displays the
generated VOTable. The text area displays only first 20 rows of the generated
VOTable.
But, when you
click on save button at the bottom, the entire VOTable gets saved.
D. FEEDBACK ADDRESS
For feedback on conVOT contact voindia@vo.iucaa.ernet.in.